Leave Management
Welcome to the new world ERP Leave Management Guide. Leave Management licensing includes two modules that are used to track time off work:
- FMLA (The Family and Medical Leave Act)
- Time Off Request
This document is available in Microsoft Word format to allow for customization to your organization’s needs and procedures.
FMLA
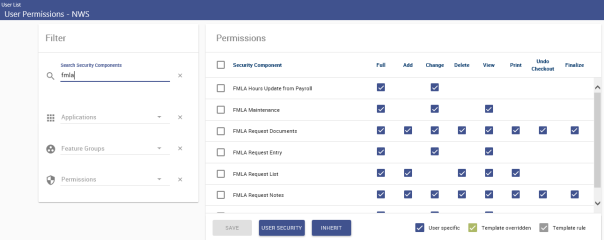
Security
Maintenance > New World ERP Suite > Security > Users
In User Permissions search for FMLA components and verify that FMLA user have the appropriate access.
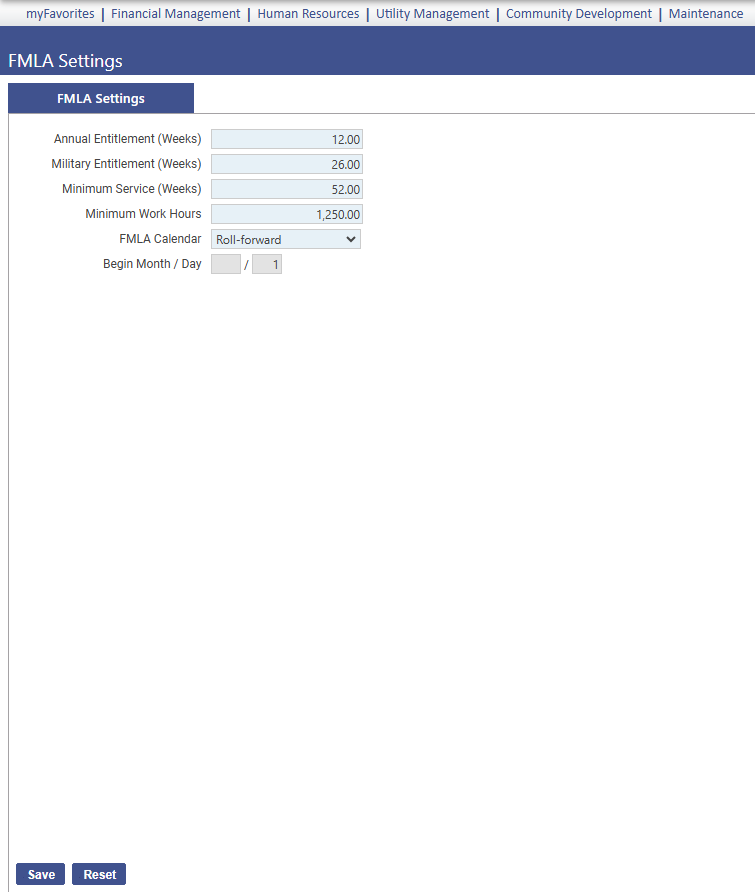
Setup
Maintenance > Human Resources > FMLA Settings
Use the FMLA Settings page to define employee FMLA entitlement and eligibility rules per federal law.
|
Field Name |
Field Description |
|---|---|
|
Annual Entitlement (Weeks) |
Number of weeks of leave permitted per year. The entry may contain two decimal places. |
|
Military Entitlement (Weeks) |
Used in conjunction with current entitlement, additional entitlement extended for military leave. |
|
Minimum Service (Weeks) |
Minimum number of weeks an employee must have worked to be eligible for FMLA. The weeks worked do not have to be consecutive. The entry may contain two decimal places. |
|
Minimum Work Hours |
To be eligible for FMLA, minimum number of hours an employee must have worked in the 12 months before the leave begins. The entry may contain two decimal places. |
|
FMLA Calendar |
Type of calendar to be used for FMLA: Fixed, Roll-forward or Roll-backward. A fixed calendar is a 12-month year with a specific starting date. Employees receive the annual entitlement, minus FMLA-protected leave taken in the current, fixed calendar year. Every employee follows this schedule. An example of a schedule may be 07.01 to 06.30. A roll-forward calendar begins the year an employee takes FMLA and ends 12 months later. It is specific to each employee. Employees receive the annual entitlement during the year beginning on the first date FMLA leave is taken; the next 12-month period does not begin until the first time FMLA leave is taken after completion of the previous 12-month period. Selecting this option disables the Begin Month/Day field. A roll-backward calendar counts the FMLA year backwards from the time an employee takes FMLA leave. It is specific to each employee. Each time an employee takes FMLA leave, the remaining leave entitlement equals the balance of the annual entitlement weeks not used during the immediately preceding 12 months. Selecting this option disables the Begin Month/Day field. |
|
Begin Month/Day |
Enabled and required for a fixed FMLA calendar, identifies the first month and day of the calendar year. These fields are disabled for roll-forward and roll-backward calendars. |
FMLA Requests
Human Resources > FMLA > FMLA Request List
The request list shows all requests that have been entered. Here you can search to find the request you are looking for or add a new request to the system.
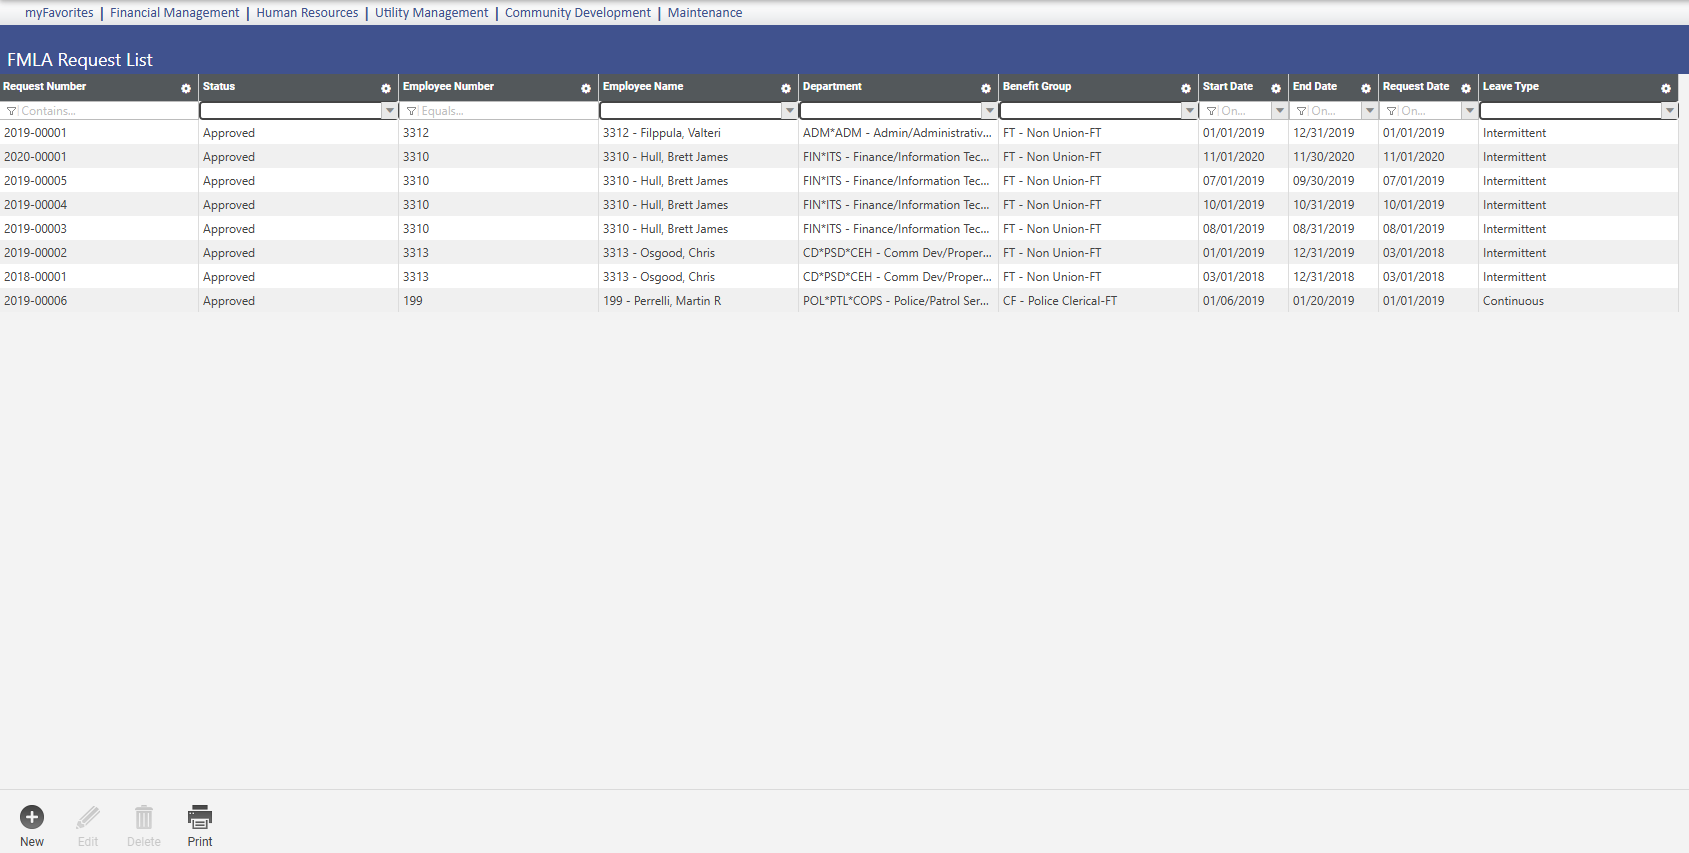

FMLA Request List
-
To add a new request, click New at the bottom left hand of the screen to open the request template.
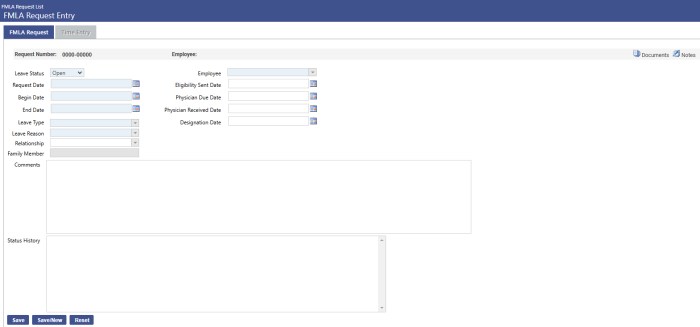
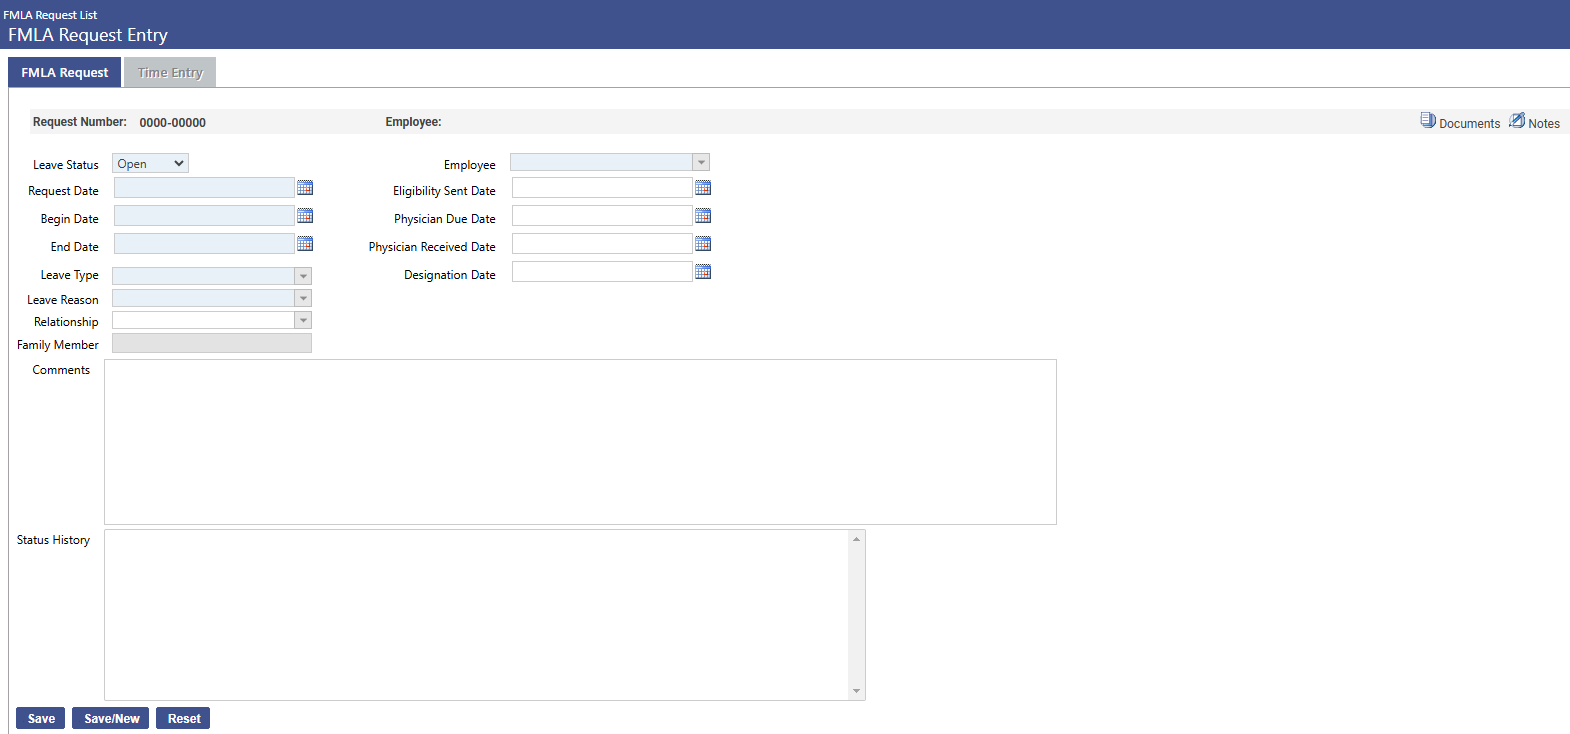
Use the FMLA Request tab to record the name of the employee requesting leave, the leave status and type, leave reason, request date, leave duration, key notifications and dates and other data pertaining to the request.
|
Field Name |
Field Description |
|---|---|
|
Leave Status |
Required. Identifies the status of the leave as Open, Approved, Completed, Canceled or Denied. On a new request, the default selection is Open. The Approved selection is available for open or denied requests only. Completed is available for approved requests only. Denied is available for open and approved requests only. Denying a request disables the Time Entry tab. Approving a request locks down the Begin Date field, since changing this date may affect the employee's leave eligibility. Once the leave request is approved, the Status History will display at the bottom of the page, and the Time Entry tab will be enabled for you to record the days and times of the leave. When an employee on leave returns to work, change the Leave Status to Completed. All entries except Comments will be locked down. The Time Entry tab also will become display-only. Canceled means the request no longer is needed. History will show the request was made but canceled. You may delete a canceled request. You may not delete an approved request that has time entered against it. |
|
Request Date |
Required. Date the employee requested leave. |
|
Begin Date |
Required. Employee's first day on leave. If the employee is going on a continuous leave, the date will be the same as the employee's employment effective date in Workforce Administration. |
|
End Date |
Required. Employee's last day on leave, not the day the employee returns to work. |
|
Leave Type |
Required. Identifies how the leave will be taken. Available selections come from validation set 477, FMLA Leave Type. Continuous refers to leave that is not broken by periods of work; it is taken continuously over a period of days or weeks. Intermittent refers to the use of periodic days or hours, while the employee continues to work. If you need to add a reason to the validation set, hold down the <Ctrl> key and click in the field. The validation set 477 pop-up will open. |
|
Employee |
Required. Employee requesting the leave. The drop-down contains the names of employees from the departments the user has access to. |
|
Leave Reason |
Required. Reason the employee is going on leave. Available selections come from validation 476, FMLA Leave Reason. If you need to add a reason to the validation set, hold down the <Ctrl> key and click in the field. The validation set 476 pop-up will open. |
|
Relationship |
If the leave is related to the care of a family member, identifies the relationship, such as mother, father, son. |
|
Family Member |
Enabled if a Relationship is selected, the family member's name. An entry is not required. |
|
Eligibility Sent Date |
Date FMLA paperwork packet is prepared/sent to employee, form WH-381. |
|
Physician Due Date |
Date physician's paperwork, confirming reason for going on leave, is due, form WH-380. |
|
Physician Received Date |
Date the physician's paperwork is received. |
|
Designation Date |
Date the employee is designated as qualifying for FMLA and form WH-382 is sent to the employee. This designation may occur before or after the employee goes on leave. |
|
Comments |
Free-form text field allowing 4,000 characters. |
|
Status History |
Displays a description of each change in the status of the request, from latest to earliest, with the latest on top. The description includes the current and previous statuses, the ID of the person who made the change and the date and time of the change. |
|
User-Defined Fields |
Customized fields created at Maintenance > new world ERP Suite > Security > User-Defined Fields, using the FMLA Request Record Type. |
- Enter in the appropriate fields as explained above and click Save.
When you save a new request, the leave request number is generated automatically. It contains a prefix appended to the next sequential number. The prefix is the year of the Request Date. This number comes from the Counters page in Company HR Settings (Maintenance > Human Resources > Company HR Settings).
Each new request will use the year and the next available number from the grid on the Counters page. If two users save an FMLA request at the same time, each will receive a different number.
Overlapping leaves are permitted; you will be prompted to accept or cancel an overlapping leave.
If you make an error in processing a leave request, you may change the Leave Status back to Open, click Save, then change the status to Approved. All other entries will be enabled for editing. You may change a denied request to open, approved or canceled.
Time Entry
Use the Time Entry tab to track the actual number of leave hours an employee has taken per week. This tab is enabled once the Leave Status on the FMLA Request tab is changed to Approved.
If necessary, you may enter time after an employee has been paid and processed in payroll. Also, an employee on unpaid leave may not be processed through payroll. Time is tracked separately from payroll.

- To add leave time to the grid, select the Week Start Date, fill in the applicable days of the week with the number of leave hours, and click the Add button. The entries will be added as a row in the grid, and the Week Start Date will default to the next Sunday.
- For an employee on continuous leave, the typical entries are 8 hours per day for an entire week.
- For an employee on intermittent leave, entries may be fewer than 8 hours on certain days of the week.
- Time entry allows four decimal places, same as the number of decimal places allowed in Hours Entry.
- The request number, employee name and leave date range are displayed above the grid.
- Once you have added hours to the grid, click Save to save them. If you need to edit hours, you may do so directly in the corresponding table cell.
To delete a week from the grid, check the corresponding box in the Delete column, and click Save.
FMLA Hours Update from Payroll
Human Resources > FMLA > FMLA Hours Update from Payroll
FMLA Hours Update from Payroll lets you update FMLA taken time from recorded payroll hours, eliminating the need to re-key time.
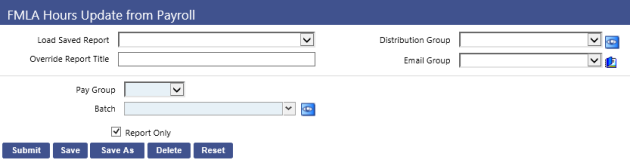
After making your selections on this page, click Submit. If Report Only is selected, a report of the FMLA hours to be updated will be generated and displayed, but the hours themselves will not be updated. If Report Only is deselected, the report will be generated and the hours will be updated after payroll processing completes.
|
Field Name |
Field Description |
|---|---|
|
Load Saved Report |
Saves this version of the report as a template for later use. When you click Save, a pop-up will ask you to name the report. Type the name, and click OK. The next time you want to run this report, select its name from the Load Saved Report drop-down, and the fields and list boxes will be populated automatically. If necessary, you may edit entries before running the report. You may save as many templates as you would like. |
|
Distribution Group |
A group of people selected to receive the report in myReports. Click in the field to select from a list of existing groups, or click the blue-eye prompt to create a new distribution group. The report will be sent to myReports for each person in the group. |
|
Override Report Title |
Overrides the default report title. |
|
Email Group |
A group of people selected to receive the report by e-mail. Click in the field to select from a list of existing groups. |
|
Pay Group |
Pay group and batch having FMLA hours updated from payroll. Only posted pay batches are available for selection. |
|
Batch |
|
|
Report Only |
Select to generate only a report showing the FMLA hours to be updated; deselect to generate a report and update the hours. |
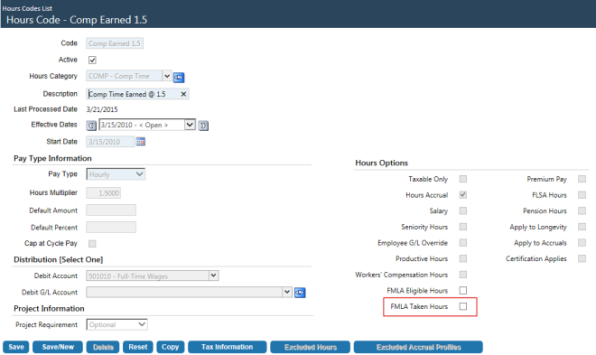
To allow you identify hours codes that are to be used for FMLA taken time, an FMLA Taken Hours check box has been added to the Hours Code page in Maintenance (Maintenance > Human Resources > Earnings Maintenance > Hours Codes > New/Hours Code).
This check box will not be disabled if the hours code is associated with a "last processed date."
Note: During the FMLA Hours import, the days are processed one at a time. When an employee has exceeded the FMLA limit, an error will show on the report, and the hours will not be imported/updated.
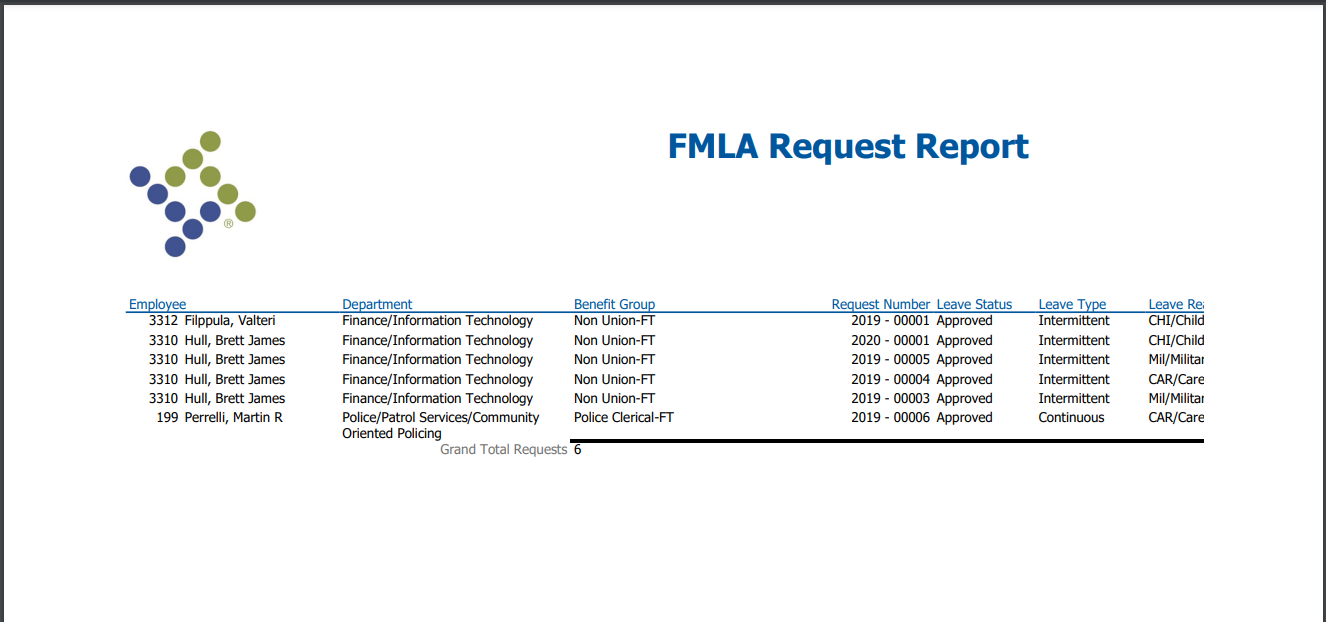
Reports
This report shows how much leave time remains for all who are on FMLA leave. The report is sorted alphabetically by employee name, followed by employee number. You will see only the requests from employees who are in departments to which you have been granted security rights through Process Manager.
Click Print at the bottom of the Request List page.
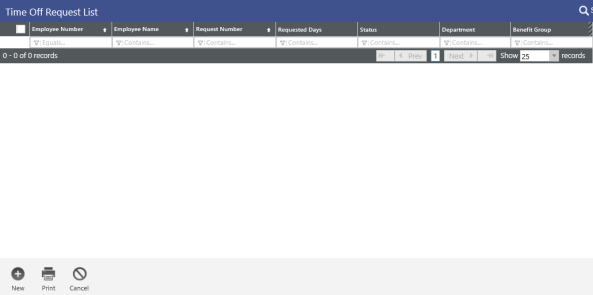
Time Off Requests
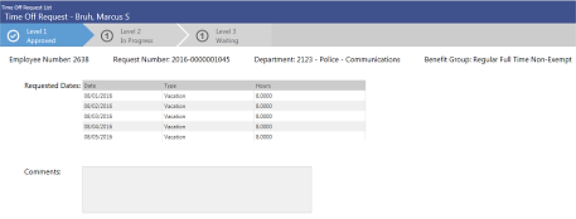
Human Resources > Time Off Requests List > Time Off Requests List
From the Time Off Request List page, you may review, approve, reject and cancel time off requests that have been made from this page or from the eEmployee module. You will see only the requests from employees whose departments are tied to the role(s) assigned to you in Maintenance.
All time off requests are contained in a grid, with each row corresponding to a request. Requests are sorted by employee name, followed by employee number and request number. You may sort or filter the grid by any column.
Request numbers in the grid link to the corresponding time off requests. Clicking a request number will take you to the details and approval history of the request on the Time Off Request page.
Security
Maintenance > new world ERP Suite > Security > Users
- Select a user from the User List page.
- Click Permissions. The Permissions page for the selected user will open, showing a grid of application security components.
- In the Search Security Components field, type time off request (the entry is not case sensitive).
-
The grid will refresh to show two Time Off Request components, Time Off Request List and Time Off Request Settings.
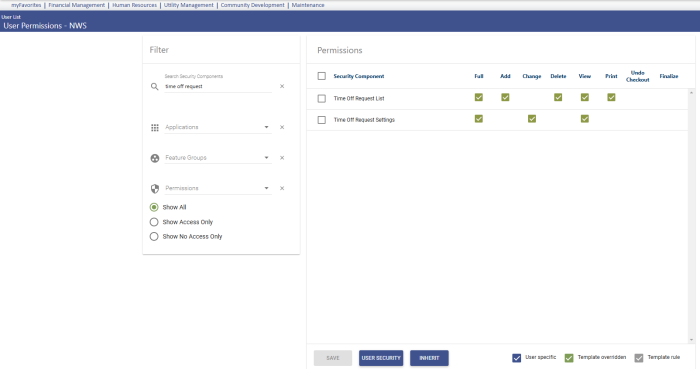

- Select the appropriate permissions for each component. For Time Off Request List, selecting View adds the Time Off Requests option to the Human Resources menu and enables the links to view request details. It does not enable buttons on the Time Off Request List or Time Off Request pages. Selecting Add enables the New button on all Time Off Request List views. Selecting Delete enables the Cancel button on the appropriate views.
- Click Save.
- For the permissions to take effect, the user will need to log off and log back on.
Setup
Create Roles
Maintenance > new world ERP Suite > Security > Roles
Roles give users access to employees, based on departments; for example, if employee Kevin Taylor works for the Parks and Recreation Department, you will not be able to view or process Kevin's time off requests unless your role includes the Parks and Recreation Department.
- Click New. The Role page will open.
- In the Role field, type the name of the role.
- Type the Description of the role. (This entry may or may not be the same as the Name.)
- Below the Role and Description is a grid of users. Select the check boxes next to the users you want to assign to the role. Assign at least one user.
- Click Save.
- To associate the role and selected user(s) with one or more departments, click the Departments button located below the grid. The Associate Departments dialog will open.
- Select the User.
- To associate the user with departments, select the corresponding department check boxes.
- Click Save.
Approval Manager
Maintenance > new world ERP Suite > Approval Manager
- Click New. The Create New Process dialog will open.
- Select the Effective Date of the approval process.
- Type the Name of the approval process.
- In the Type field, select Time Off Requests.
- If you want to set up a sequential approval process, select Sequential Approval.
- A sequential approval process must begin with the first-level approver. An approval marked for return is returned to the previous submitter, and an approval that is rejected ends the approval process, locks the record and moves it to the canceled list.
- A non-sequential approval process may begin with an approver at any level. Email notifications are sent to all approvers, not only the next in line, that a change or request needs to be approved. A level-3 approval may follow immediately after a level-1 approval, completing the process, despite the lack of a level-2 approval.
- Select the check boxes next to the departments that will use the approval process.
- Click Save. The Edit Process dialog will open, containing a grid of the department(s) you just added.
- Click the Departments button if you need to add more departments to this process.
Next, you will add approval levels to a department.
- Select/Highlight a department that will use this approval process.
- Click Approval Levels.
- The Manage Approval Levels dialog will open.
- Click Add. The Edit Approval Level dialog will open.
- Type the Name of the approval level.
- In the Required Approvers (#) field, type the number of approvers required at this level.
- Click Save. The Manage Approval Levels dialog will reopen, containing a row for the level you just created.
To add another approval level, repeat steps 12-15.
Next, you will add users to the approval level(s).
- Click the Back button. The Edit Process dialog will open.
- Click the name of a department in the grid. The Manage Approval Levels dialog will open.
- Click an approval level. The Edit Approval Level dialog will open, with a grid of users displayed below the Name and Required Approvers (#) fields.
- Select the check box next to each user who will approve at this level.
- Click Save.
- Repeat steps 12-20 to add approval levels and users as necessary. When you are finished, the Manage Approval Levels dialog should contain rows for each approval level.
- You may reorder approval levels by dragging them to the appropriate places.
- Click Back to return to the Approval Manager grid.
Select the Approval Processes and Roles
Maintenance > Human Resources > Time Off Request > Time Off Request Settings
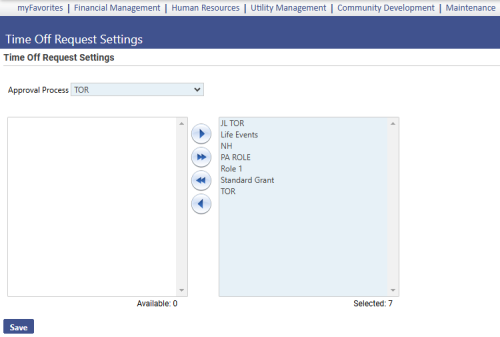
- Select the Time Off Request Approval Process.
- Select the roles to be used by Time Off Requests by moving them from the Available list box to the Selected list box.
- Click Save.
Assign Accrual Plan Profiles to Time Off Request
Maintenance > Human Resources > Employee Attributes > Accrual Plans
- Click the edit icon next to the accrual plan containing the profile you want to assign to Time Off Request.
- Click the Profiles tab.
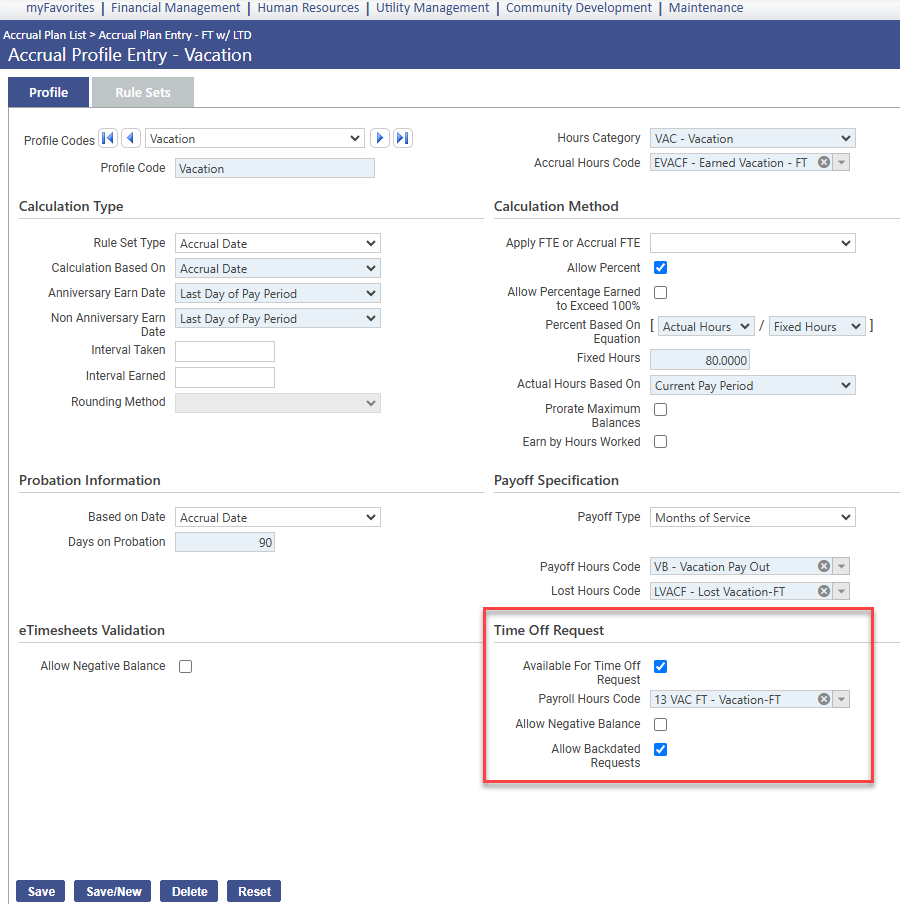
- Click the edit icon next to the profile you want. The Accrual Profile Entry page will open.
- To make this profile available for time off requests, select the Available for Time Off Request check box. Selecting this box will enable the Payroll Hours Code field.
- In the Payroll Hours Code field, select the hours code to be charged for the time off during payroll processing.
- To allow employees with this profile to request time off before it is earned, thus reducing their current balances to less than zero, select the Allow Negative Balance check box.
- Click Save.
- Repeat these steps for each applicable profile.
Set Counters for Time Off
Maintenance > Human Resources > Company HR Settings > Counters
- To change a Counter Number, double click in the appropriate cell to enable it for editing.
- Click Save.
When the first time off request of the year is created, the counter will display. Each subsequent request for the year will increment the counter by one.
Request Time Off
Human Resources > Time Off Requests > Time Off Request List
- Click the New button. The New Time Off Request dialog will open.
- Select the employee making the request. Employees who are not terminated and those who belong to departments attached to your role will be available on the drop-down.
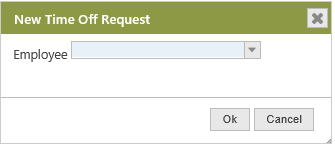
- Click OK. The Create Time Off Request page will open, containing a calendar, a grid of available time balances per accrual category and a comments section.
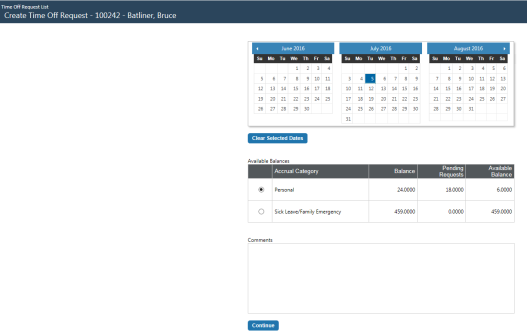
- In the calendar, click the days you are requesting to have off. When selected, they will be shaded in blue. To clear a selected date, click it again. To clear all selected dates, click the Clear Selected Dates button.
- In the Accrual Information grid, select the radio button next to the accrual category you will be using. Available accrual categories are based on the accrual profile associated with your primary job as of today.
Accrual balances are the net of earned time - taken time, as of a specific date.
Earned time = payroll hours worked * hours multiplier, where the hours code is flagged as an accrual.
Time taken = payroll hours worked, where the hours code is not flagged as an accrual.
Balance (as of date) = earned time - time taken.
Payroll hours must be tied to a pay batch with a status of 4 (posted).
Hours code must have a pay type of H (Hourly).
Hours category must be flagged as an accrual.
- In the calendar, click the days you are requesting to have off. When selected, they will be shaded in blue. To clear a selected date, click it again. To clear all selected dates, click the Clear Selected Dates button. Select at least one day to continue to the details page.
- In the Comments section, type any comments that apply to the time off request. (Comments are not required.)
- Click the Continue button. The Create Time Off Request page will refresh, showing a grid of your selections and, if applicable, your comments.
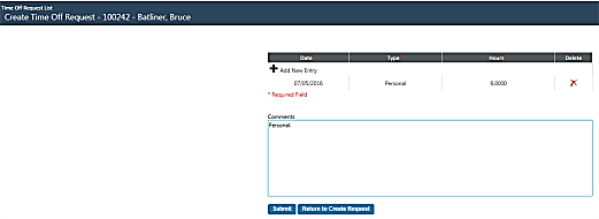
The Hours column will default the daily hours from the employee's Jobs tab in Workforce Administration.
- If you want to change the hours, accrual category or date, click in the appropriate cell to enable it.
- If you want to add another day to the time off request, click Add New Entry in the top-left corner of the grid. The top row of the grid will be enabled to let you select the date, type (accrual category) and number of hours, and Apply and Cancel buttons will display.
- If you are satisfied with the request details, click Submit. The primary job of the employee as of the time off request date will be verified, accrual balance and probation validations will be run, a request submitted message will display, the request will be given a number and added to the grid on the Time Off Request List page, and the employee will receive an email notification confirming the request has been submitted and providing a link to the request. The email will be sent to the primary email address set up for the employee in new world ERP.
When you submit a request, an email notification also will be sent to the person(s) responsible for approving the request. If the approval process has been set up as sequential, the notification will be sent to the approver(s) at level 1. If the approval process has been set up as non-sequential, notification will be sent to all users on all levels.
- Approvers also will see a myTasks link for the request on their home pages.
Approve Time Off Requests
Human Resources > Time Off Requests > Time Off Request List
- Click the employee's hyperlinked Request Number. The Time Off Request page will open, containing a series of buttons, including Print, Approve, Reject, Return and Cancel at the bottom.
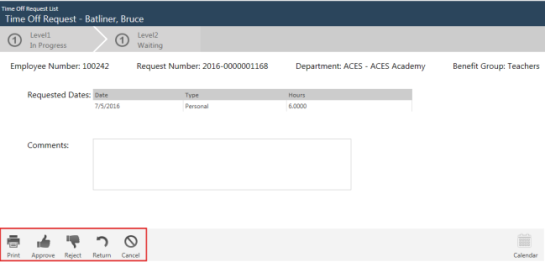
If the time off request is at your level of approval, the Approve button is active. Click the button to approve the request. If you are not the last or only approver, the request will move to the next approver. Following an approval, rejection or cancellation, the employee will receive an email notification.
Note: First-level approvers are not able to return requests to the submitters. Also, requests cannot be returned to eSuite.
Note: If the request has been submitted and you have permission in Approval Manager at the current level of 2 or higher, the Return button is enabled. If you do not have permission set up in Approval Manager or have it at the current level of 1 only, the button is disabled. If the request has not been submitted, the button is disabled. Once you have submitted a return, the approval status timeline is updated.
- To approve the request, click the Approve button. The Approve dialog will open.
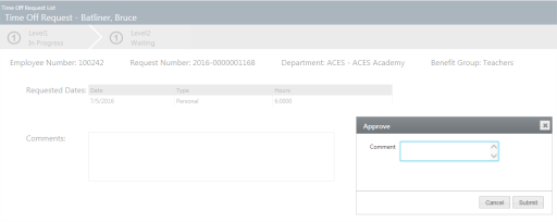
- You may add a comment, if applicable.
- Click Submit. The Approve Results pop-up will display.
- Click Close. The approval timeline will update to show the approval progress, and the Time Off Request List page will update to show the latest approval Status.